Have you ever wondered how to hatch and raise chicks using a broody hen? It’s a fascinating process that allows nature to do its magic. When a hen becomes broody, she is driven by instinct to sit on her eggs and patiently wait for them to hatch. In this article, we will explore the fascinating world of using a broody hen as a natural incubator and how to successfully raise the adorable fluffy chicks that emerge from their shells. Get ready to embark on a delightful journey of hatching and raising chicks with the help of a broody hen!

Preparing for Hatching
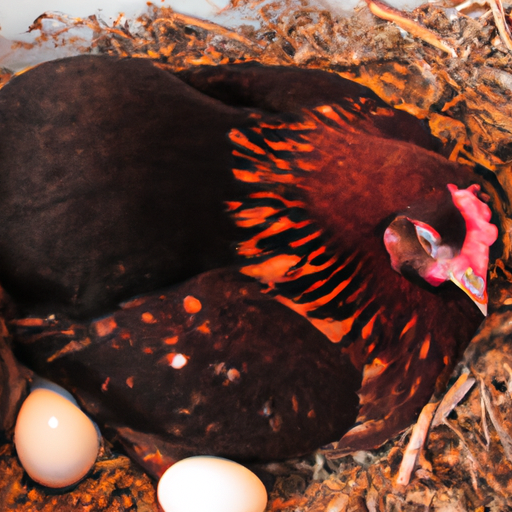
Choosing a Broody Hen
When it comes to hatching chicks using a broody hen, selecting the right hen is crucial. Look for a hen that exhibits broody behavior, such as sitting on the nest for extended periods and showing signs of aggression when approached. Common broody breeds include Silkies, Orpingtons, and Cochins. It’s important to choose a hen that is healthy, well-maintained, and has a good temperament.
Providing a Suitable Nesting Area
To ensure a successful hatching process, create a comfortable and safe nesting area for your broody hen. Choose a secluded spot in the coop or provide a separate nesting box filled with soft bedding materials like straw or shavings. The nest should be well-insulated and protected from predators, providing a peaceful environment for the hen to incubate her eggs.
Gathering Fertile Eggs
To begin the hatching process, you will need fertile eggs from a reliable source. Choose eggs that are free from defects or cracks and have been stored properly. Ensure that the eggs are no more than a week old for optimal chances of successful hatching. It’s best to collect eggs daily and store them in a cool room until ready for incubation.
Setting Up the Broody Hen
Isolating the Broody Hen
Separating the broody hen from the rest of the flock is essential to ensure successful hatching and minimize disruptions. Provide a separate area within the coop or use a broody coop specifically designed for this purpose. Isolating the hen prevents interference from other chickens and allows her to focus on incubating the eggs without distractions.
Ensuring a Calm Environment
Creating a calm and stress-free environment is crucial for both the broody hen and the developing chicks. Minimize noise, disturbances, and sudden changes in the surrounding environment. Avoid handling or disturbing the hen unnecessarily, as it may disrupt her incubation process. Provide a peaceful atmosphere that promotes the natural behavior of the broody hen.
Providing Food and Water
While the hen is incubating the eggs, it’s important to provide her with easy access to fresh food and water. Ensure that the food and water containers are within reach of the nesting area, allowing the hen to nourish herself without having to leave the eggs for extended periods. A well-balanced diet and access to clean water will support the hen’s health and the development of the chicks.
Monitoring the Incubation Process
Checking on the Broody Hen
During the incubation period, it’s important to regularly check on the broody hen to ensure her well-being and the progress of the eggs. Keep an eye on her behavior, making sure she remains dedicated to incubating the eggs and doesn’t abandon the nest. Take note of any potential signs of illness or distress, such as lack of appetite or unusual behavior.
Monitoring Temperature and Humidity
Maintaining the proper temperature and humidity levels in the nesting area is crucial for successful egg incubation. Aim for a temperature of around 99-101°F (37-38°C) and a humidity level of about 50-60%. Use a reliable thermometer and hygrometer to monitor these conditions regularly. Make necessary adjustments by adding or removing bedding, adjusting ventilation, or using a heat source if required.
Candling the Eggs
Candling is a process that involves shining a light through the egg to observe the development of the embryo. This technique can help determine the fertility of the eggs and monitor their progress. Use a small, handheld flashlight or a dedicated egg candler to gently illuminate the eggs in a dark room. Look for signs of growth, such as veins or movement, and remove any infertile or damaged eggs if necessary.
Caring for the Broody Hen
Providing Daily Exercise
While the broody hen is incubating, it’s important to encourage daily exercise to maintain her physical and mental well-being. Allow her some time outside of the nesting area to stretch her legs, forage, and dust bathe. Providing a designated area within the coop or run where she can safely exercise will keep her active and reduce the risk of muscle atrophy.
Maintaining Proper Nutrition
A well-balanced diet is crucial for the broody hen to support her own health and the development of the chicks. Provide her with high-quality layer feed supplemented with calcium-rich treats such as crushed oyster shells. Adding fresh fruits, vegetables, and herbs can also enhance her nutritional intake. Monitor her food consumption and make adjustments as necessary.
Ensuring Adequate Hydration
Hydration is essential for the broody hen, especially during the incubation period. Ensure that she has access to fresh, clean water at all times. Consider using a nipple waterer or a shallow dish to prevent spillage and keep the water clean. Monitor her water intake regularly and refill as needed to ensure she is properly hydrated.
Preparing for Hatching
Creating a Safe Hatch Area
Before hatching begins, prepare a safe area within the coop or a separate brooder box for the arrival of the chicks. The area should be free from drafts, predators, and other animals that may harm the newborns. Provide a soft bedding material such as straw or wood shavings for the chicks to rest on, ensuring their comfort and warmth.
Separating Chicks from Other Animals
To protect the vulnerable chicks, it’s important to keep them separate from other animals, including adult chickens, until they are strong enough to defend themselves. Introduce the chicks to the rest of the flock gradually once they have grown and developed feathers, typically around 6-8 weeks of age. This gradual introduction reduces the risk of aggression and ensures a smooth integration process.
Preparing a Brooder Box
A brooder box is a temporary habitat for the newly hatched chicks. It should be well-ventilated, secure, and equipped with a heat source, such as a heat lamp or a brooder plate. Line the brooder box with clean bedding material to absorb moisture and provide a comfortable environment. Keep the temperature around 90-95°F (32-35°C) initially and gradually decrease it as the chicks grow.
Assisting with Hatching
Knowing When Assistance Is Needed
Most chicks will hatch on their own without any assistance. However, there are cases where intervention may be necessary. If a chick is visibly struggling to emerge from the shell or has been pipped for over 24-48 hours without progression, it may need assistance. Proceed with caution and only intervene if absolutely necessary, as excessive interference can harm the chick.
Providing Gentle Assistance
If assisting a chick during hatching, it’s important to be gentle and patient. Moisten the membrane around the piped area with warm water using a cotton ball or a small spray bottle. Carefully remove small pieces of shell to create a larger opening, allowing the chick to breathe. Avoid pulling or forcing the chick out, as it needs to complete the hatching process on its own.
Allowing Chicks to Dry
After assisting with hatching, give the chicks time to dry and fluff up their feathers. Avoid handling them excessively during this crucial period, as their feathers, called down, need to dry completely to provide adequate insulation. Maintain the temperature and humidity in the brooder box to ensure their comfort and promote proper feather development.
Caring for Newly Hatched Chicks
Moving Chicks to Brooder Box
Once the chicks have hatched and are dry, transfer them to the prepared brooder box. Gently place them in the warm, clean environment and ensure they have easy access to food and water. Monitor their behavior closely during this transition and provide comfort and reassurance as needed.
Offering Warmth and Comfort
After being hatched, chicks rely on external sources of warmth. Maintain the temperature in the brooder box at around 85-90°F (29-32°C) for the first week, gradually reducing it by 5°F (2-3°C) each week until reaching the ambient room temperature. Use a heat lamp or brooder plate to provide a consistent heat source and ensure that all chicks have access to warmth.
Providing Adequate Ventilation
While it’s important to maintain a warm and comfortable environment for the chicks, ensuring adequate ventilation is equally crucial. Good airflow prevents the buildup of ammonia and helps maintain a healthy atmosphere for the chicks. Monitor the humidity levels to avoid excessive moisture, as this can lead to respiratory issues.
Feeding and Watering Chicks
Introducing Chick Starter Feed
Once the chicks are settled in the brooder box, introduce them to a high-quality chick starter feed specially formulated for their nutritional needs. The feed should provide a balanced diet with essential nutrients, vitamins, and minerals to support their growth and development. Offer the chick starter feed in shallow dishes and make sure it is easily accessible to all chicks.
Offering Fresh Water
Alongside the chick starter feed, fresh and clean water should always be available to the chicks. Use a shallow dish or a waterer specifically designed for chicks to prevent drowning. Check the water regularly to ensure it is clean and free from debris. Adjust the waterer height as the chicks grow to accommodate their size and prevent spillage.
Monitoring Feeding Behavior
Regularly observe the chicks’ feeding behavior to ensure they are eating and drinking adequately. Healthy chicks will show interest in food, actively pecking at it and exploring the water source. If you notice any signs of lack of appetite, listlessness, or abnormal behavior, consult a veterinarian for guidance as it may indicate an underlying health issue.
Disease Prevention
Maintaining Cleanliness
Proper hygiene and cleanliness are essential for preventing the spread of diseases among the chicks. Regularly clean and disinfect the brooder box, replacing soiled bedding with fresh material to minimize bacterial buildup. Provide clean water and regularly remove any food debris or droppings. Wash your hands thoroughly before and after handling the chicks to prevent cross-contamination.
Vaccinating Chicks
Consult with a veterinarian or avian specialist to determine if any vaccinations are necessary for the specific diseases prevalent in your area. Vaccinations can help protect the chicks from common infectious diseases and ensure a healthy start to their lives. Follow the recommended vaccination schedule and keep accurate records for future reference.
Observing Signs of Illness
Keep a close eye on the behavior and appearance of the chicks for any signs of illness. Common symptoms of illness in chicks include lethargy, lack of appetite, abnormal droppings, disheveled feathers, difficulty breathing, or changes in behavior. Seek veterinary assistance promptly if you notice any signs of illness, as early intervention can greatly improve the chances of a positive outcome.
Integrating Chicks with Flock
Gradual Introduction to the Flock
When the chicks reach an appropriate age, typically around 6-8 weeks, you can begin the process of integrating them with the rest of the flock. Choose a time when the adult chickens are calm and not focused on feeding or territorial behavior. Gradually introduce the chicks to the flock by allowing supervised interactions in a neutral territory, gradually increasing the exposure time.
Supervising Initial Interactions
During the initial interactions, closely monitor the behavior of both the adult chickens and the chicks. Ensure that the adult chickens do not exhibit aggressive or territorial behavior towards the newcomers. If any bullying or aggressive behavior occurs, separate the chicks and adult chickens immediately and retry the introduction after a few days.
Ensuring Safety and Socialization
As the integration progresses, provide adequate space, resources, and necessary structures such as roosts and nesting boxes to ensure the well-being of the entire flock. Allow the chicks to gradually explore the coop and run, providing them with opportunities for socialization and establishing their place in the hierarchy. Regularly monitor the interactions and intervene if necessary to maintain a harmonious flock dynamic.
By following these comprehensive steps, you can successfully hatch and raise chicks using a broody hen. Remember to provide a suitable nesting area, monitor the incubation process, care for the broody hen, prepare for hatching, assist with hatching if necessary, care for the newly hatched chicks, and ensure their integration with the existing flock is smooth and safe. With patience, attention to detail, and proper care, you can experience the joy of watching your broody hen raise a healthy and happy batch of chicks.